Guides · 2026-10-08
Turn a Sprite Sheet into Layers in Photoshop (and Back)
You have a sprite sheet: a run cycle, a set of icons, eight frames of an explosion laid out on a grid. You want each frame on its own layer, to fix one of them, to retime the animation in the Timeline, or to swap a few frames for new ones. Then you want the sheet back, with every frame exactly where it was.
Photoshop has no command for either direction. On Adobe Community the question "Slicing a sprite sheet into their own layers?" has been read more than 3,500 times, and the answers are scripts and workarounds. Here's a way that uses only what ships with Photoshop, the way back, and a free panel that does both.
Splitting a sheet into layers, the built-in way
This works when the frames sit on a regular grid: every cell the same size, no extra margin around the sheet. Check the cell size first: sheet width ÷ columns and sheet height ÷ rows should both be whole numbers.
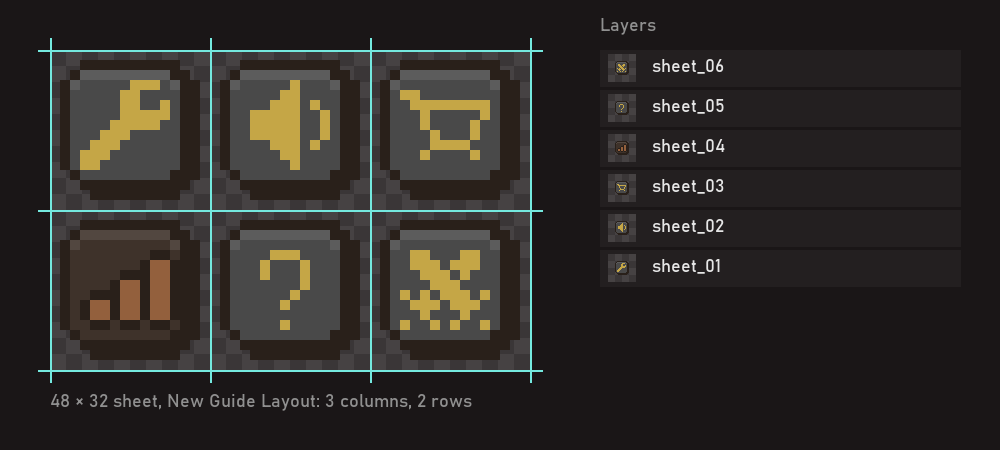
- Open the sheet and choose View > Guides > New Guide Layout.
- Set Columns and Rows to the number of frames across and down. Set Gutter to 0 and untick Margin. Click OK: you now have a guide on every cell edge.
- Pick the Slice tool (it shares a slot with the Crop tool) and click Slices From Guides in the options bar. Photoshop makes one slice per cell.
- Choose File > Export > Save for Web (Legacy). Pick PNG-24 with Transparency on, and under Export choose All User Slices. Save to an empty folder. Each cell becomes its own PNG, named after the document plus a number.
- Choose File > Scripts > Load Files into Stack, click Browse and select all the PNGs. Click OK.
You get a new document the size of one cell, with one layer per frame, named after the files. Because every cell is the same size, the frames line up on top of each other, ready for Timeline > Create Frame Animation > Make Frames From Layers.
Its limits:
- Only regular grids. If the frames have different sizes or a margin, the guides won't match the cells and you'll cut frames in half.
- Five dialogs every time. Fine once; tedious for a dozen sheets.
- Layer order follows file names. Check that frame 10 doesn't land between frame 1 and frame 2 (Photoshop sorts by name).
Putting layers back into a sheet
Photoshop can't arrange layers on a grid for you either. The manual way:
- Note the cell size (the size of your frame document) and decide the columns and rows.
- Image > Canvas Size: set the width to cell width × columns and the height to cell height × rows, with the anchor at the top-left.
- For each frame, select its layer, press Ctrl+T (Cmd+T on Mac) and type the offset into the X and Y fields of the options bar, with the reference point set to top-left: frame 2 moves right by one cell width, frame 5 moves down one row, and so on.
- File > Export > Export As PNG.
It works and it's exact, but it's typing two numbers for every frame. A 24-frame sheet is 48 numbers.
You'll also find File > Automate > Contact Sheet II suggested for this. It lays files out on a grid, but it scales each image to fit its cell and adds spacing and captions by default, so check the result pixel by pixel before you trust it with pixel art.
Or with SpriteSheet (free)
SpriteSheet is a free Photoshop panel we made because we were doing both of the above by hand. No key, no account, free for commercial work.
Sheet to layers
- Drop the sheet file on the panel, or click the panel to pick it. It reads PNG, JPG, GIF, BMP, TIFF, PSD, PSB and WebP.
- The panel reads the grid from the transparent gaps between frames and shows what it found. If the frames touch, there are no gaps to read, so it tells you and asks for columns and rows, or the cell size in pixels. You type the grid yourself also for sheets without transparency and for very large sheets (over 12 megapixels).
- Click Split. You get a new document the size of one cell, with one layer per frame named 01, 02, 03…, read left to right and top to bottom. Empty cells are skipped (you can keep them). Your original file is never touched.
Layers to a sheet
- Select the frame layers (at least two).
- Choose how each frame sits in its cell:
- As on canvas keeps every layer where it is, so registration between frames stays exact. An empty layer stays an empty frame, so the timing doesn't shift.
- Trimmed makes each cell the size of the largest frame and sits every frame on the bottom-centre, the pivot Unity and Godot expect for characters.
- Export. Frames are ordered by the number in the layer name (01, 02…), or bottom to top if the names have no numbers. The panel picks the columns for the fewest empty cells and writes a PNG; your document isn't modified.
It's free, works in Photoshop 2023 (v24.0) and later, and is tested on Photoshop 2026 for Windows. The panel is in 10 languages.
Quick answers
My frames are different sizes. Can I still split the sheet? Not with a grid tool. Both the built-in method and SpriteSheet cut the sheet into equal cells. For packed sheets of different sizes (a TexturePacker atlas, say) you need the atlas's data file to cut them correctly.
Does it write the JSON or .meta file for my engine? No. SpriteSheet writes the PNG. In Unity set Sprite Mode to Multiple and slice by cell size in the Sprite Editor; in Godot set Hframes and Vframes on the Sprite2D.
Why do my frames jitter after I rebuild the sheet? Usually because each frame was trimmed to its own pixels and lost its position. Keep As on canvas, or use Trimmed so every frame shares the same bottom-centre pivot.
Related: Export Photoshop layers as PNG without trimming · Why pixel art goes blurry when you place it in Photoshop
The plug-in in this guide: SpriteSheet.